10.3.2.2 Hard
Machined Ceramic
For parts made of technical ceramics for
machine construction applications, the tolerances mentioned
above for functional surfaces are often inadequate for the
user's needs. For this reason, tolerances for ceramic parts
in accordance with
DIN ISO 2768-m-K
are quoted. These can be achieved through
hard machining.
Drawing specifications
Dimensional tolerances that do not correspond
to the general tolerances according to this standard are to
be listed according to DIN 40 680-1 and -2 as tolerances or
as ISO tolerance zones, directly stating the appropriate nominal
dimension.
General tolerances with symmetrical dimensions with accuracy
grades "medium" and "coarse" according
to tables 29 and 30 are not added directly to the nominal
dimensions. Instead, the following entries are made in the
title block:
DIN 40 680-A-m or
DIN 40 680-A-g.
If several ceramic parts are shown on a
single drawing, and if those parts are produced using different
processes and therefore possess general tolerances with different
grades of precision as specified by DIN 40 680-1, then the
coarsest precision grade is entered into the title block.
The tolerances with the finer precision grade are then added
to the corresponding nominal dimension.
It can happen that for reasons of function, or for reasons
concerned with production techniques, either only positive
or only negative tolerance dimensions can be shown, but that
the tolerance range is nevertheless intended to correspond
to one of the particular precision grades in the general tolerances
according to tables 29/30. In such cases, the figure for the
associated general tolerance is doubled where the relevant
nominal dimension is stated, and simply given an arithmetic
sign. These tolerances, however, are not considered general
tolerances, and are thus added to the corresponding nominal
dimension rather than being entered into the title block.
Since the general tolerances for the "fine" accuracy
grade are not fixed, either the tolerance agreed between the
user and the manufacturer or the ISO tolerances are always
added after the nominal dimension.
For further details, see DIN 40 680-1.

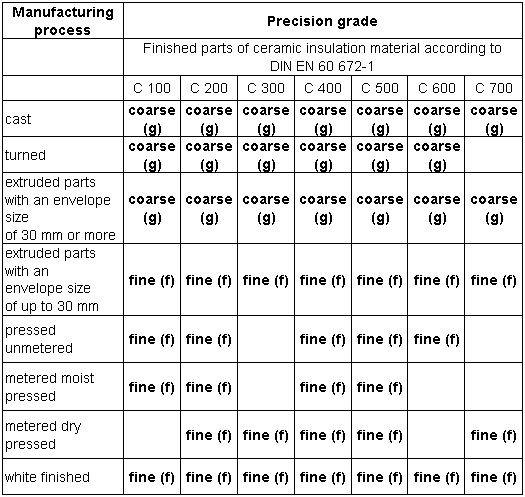
Table 29: Manufacturing procedures
for dimensional tolerances in accordance
with DIN 40 680-1 for the "coarse" and " fine"
precision grades

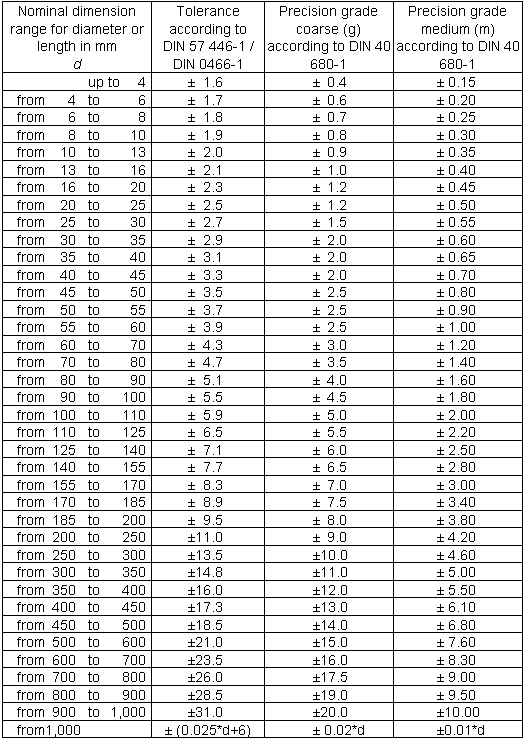
Table 30: General tolerances for products
without finishing after firing
|

