10.3.3 General
Shape Tolerances
10.3.3.1 "As Fired" Ceramic
The general shape tolerances according to
DIN 40 680-2 are valid for parts made of
ceramic materials according to DIN EN 60 672-1. This is also
applied in an analogous manner to fine ceramic products for
general technical purposes.
Deviations in shape arise due to the peculiarities of ceramic
technologies (see p. 81). Reducing shape tolerances is only
possible with increased technical effort, and must be agreed
between the manufacturer and customer in the light of the
particular application.
In addition to shape tolerances, dimensional tolerances may
have to be taken into account for some applications (see p.
218).
A shape tolerance relates only to the corresponding form element
of a ceramic part. It defines a range within which the actual
shape of a form element can deviate from the geometrical form.
Types of shape tolerance include
- straightness tolerance,
- flatness tolerance and
- cylindrical tolerance.
Additionally, positional tolerances such as:
- parallelism,
- perpendicularity,
- run out and
- wobble
must be borne in mind and may have to be specified.
The shape tolerance for a geometric form element of the ceramic
part is defined by tolerance zones.
If the ceramic parts are to be glazed or given an electrically
conductive coating, the combined accuracies are valid for
the finished product.
Straightness (B)
Definition:
The straightness tolerance of a line is the
distance between two parallel planes between which all points
on the line must lie if the tolerance is specified in only
one direction.
Table 31 lists straightness tolerances in mm for workpieces
up to 1000 mm long. They are to be calculated according to
the quoted formula for workpieces more than 1000 mm long.
Depending on the manufacturing process, three accuracy grades
are differentiated.
- Coarse (g) for tolerances that can be
maintained by ceramic manufacturing techniques, for example,
by extruding, casting or turning, which find use in high
voltage electrical and chemical apparatus technologies.
- Medium(m) applies primarily to ceramic
products of medium size produced by extruding, unmetered
pressing, metered moist pressing, metered dry pressing or
white finishing.
- Fine (f) applies to products for which
the accuracy grades coarse and medium are inadequate. The
fine grade can only be achieved using additional measures
such as grinding after sintering. If the required accuracy
is "fine", then the degree of accuracy must be
agreed between the manufacturer and user.
The specification for general tolerances for straightness
(B) of "medium" accuracy grade is:
General tolerance DIN 40 680-B-m.
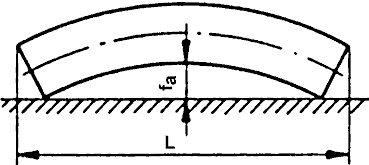
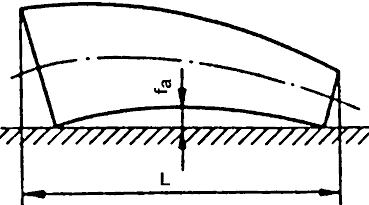
Straightness measurement:

Figure 210: Deviation of straightness of
a cylindrically shaped part in accordance with DIN 40 680-2
(cf. Table 31)

Figure 211: Deviation of straightness
of a non-cylindrical shaped part (cone) in accordance with
DIN 40 680-2 (cf. Table 31)
Flatness (C)
Definition:
The flatness tolerance is the distance between
two parallel planes between which all points of the specified
surface must lie.
The specification for flatness tolerance depends on the type
of ceramic material, the shape of the part and the manufacturing
process. Similarly to straightness, and depending on the manufacturing
process, the three precision grades of "coarse",
"medium", and "fine", are distinguished.
They correspond approximately to a percentage of the longest
linear dimension to be found within the surface, and are listed
in Table 31.
- coarse (g)
tolerance = 0.8 % * length
- medium (m)
tolerance = 0.5 % * length
- fine (f)
is to be agreed between the manufacturer and user.
Cylindrical shape (D)
Definition:
The cylindrical shape tolerance is the distance
between two coaxial cylinders between which all the points
on the surface of the cylinder must lie.
The cylinder shape tolerance to be specified depends on the
type of ceramic material, the shape of the part and the manufacturing
process. The values for the cylindrical shape tolerance are
subject to agreement between the manufacturer and the user.
|

