10.5.1.2 4-Point
Bending Test
The test jig consists of two supports, as
in the 3-point bending test, with identical specifications.
Two loading pins, whose centres are separated by half of the
distance between the supports (see table 33), are positioned
symmetrically to an accuracy of ± 0.2 mm between the
sample supports, and the force is introduced perpendicularly
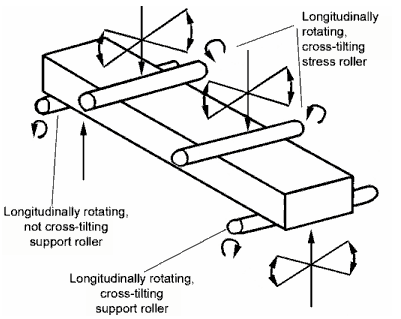
to the test piece. Both loading pins must be able to rotate
freely and independently around their axes and in a direction
parallel to the long axes of the test piece. In this manner,
the optimal alignment between the loading pins and the support
pins can be achieved.

Figure 213: Schematic illustration of the
4-point bending test
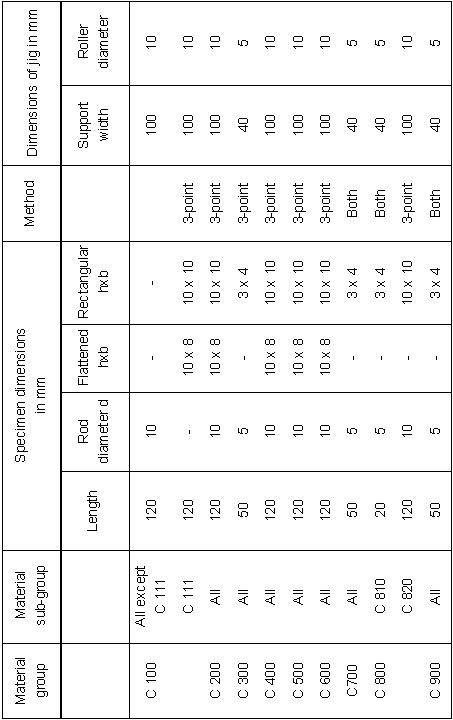
The test piece must prepared to the dimensions given in Table
33 and shown in Figure 213, according to their group classification
(DIN EN 60 672-2 and DIN EN 843-1). The test piece must be
made using the process from which the product is expected
to be manufactured (see pp. 70-76). Any surface treatment
such as grinding, polishing, etc. should be noted and be representative
of the surface of the product, since the fracture strength
of ceramic can be affected by the surface quality. The minimum
number of test pieces for each test is 10.

Table 33: Sample and test
instrument dimensions
|

